Remote control for my 3D printer
Tuesday 19 January 2021
3D
Since the 3D printer now has found its final place, it is time to look at the printing process itself.
The first topic to look at is how to get the file that needs to be printed to the printer. The printer does not have a network interface, but it does have a USB connector. To print a file there are 2 options: connect the printer to a computer and directly control the printer. Or copy the print file to a SD card and move the card to the printer and select the file in the menu on the printer. So far, I mainly used the SD card to print, but that process becomes a bit tedious over time and I can’t imagine that the card will have long lifetime.
The second topic is: how to keep an eye on what the printer is doing? The bigger the thing you want to print, the more time it takes. For example: the spool holder used in the enclosure took just over 7 hours to print. During that time, you want to monitor the process and be able to stop it when something goes wrong. But you don’t want to constantly sit in the room keeping an eye on the printer.
Time to look at how to remotely control the printer.
We need software
A quick search on the internet showed that a lot of 3D printer owners use OctoPrint to remotely control their printer. OctoPrint is a web-based application and the functionality of it can be extended by adding plugins. This allows me to use any device with a web browser to control the printer, which means I can use my phone, tablet, Chromebook or laptop.
OctoPrint by default supports the use of a webcam to keep an eye on the printer. Next to that, I found Octolapse which allows you to make nice time lapses of your prints. And that can result in videos like this:
And we need a computer
Controlling a printer does not take much CPU power; it’s just a copy of a file over a serial link to the printer. Streaming video from a webcam is a bit more challenging; especially when the video format needs re-encoding.
Most users of OctoPrint use a Raspberry Pi. It is a cheap device; takes little room and provides enough punch to host this workload. Since I had one in stock, that decision was quickly made.
All-in-one installation
There’s no need to install all the software in steps. OctoPi is a pre-configured operating system for the Raspberry Pi and comes with OctoPrint and some useful plugins nicely installed and configured. We just need to download the image, stick it onto an SD card, insert SD card in Raspberry Pi, power it up and we are done. Connected the printer to the Raspberry Pi using a USB cable and here we go. On first use, you will be guided through some configuration steps. Once that is done, the printer is configure and the software and plugins are updated.
I use PrusaSlicer to create the print files for my printer. PrusaSlicer comes with an option to directly upload the file to OctoPrint. To allow PrusaSlicer to upload files to OctoPrint, you will need to create an API key in OctoPrint and use that in PrusaSlicer. Once that is done, uploading a print file is straight forward. No more copying files to SD cards and moving them around; job done.
How about the webcam?
The next topic was how to keep an eye on the printer? I didn’t want to spend too much money on a webcam, but due to the COVID-19 pandemic, videoconferencing is hot and as a result, webcams are expensive and short on supply. I noticed that some users of OctoPrint used an aging model of a Logitech camera: C270. It is a very basic HD 720p webcam that has been on the market for almost 10 years now. You can still order new ones, but the prices are ridiculous. A quick search on a local used goods website resulted in a contact with a seller that had a few of these cameras laying around. They were brand new, but some of them didn’t have the original box anymore. Well, for 5 euro per camera, I just went for it and bought a bunch of them. When they arrived a few days later, I was pleasantly surprised; all of them worked and not a scratch on any of them.
I connected one of the cameras to the Raspberry Pi and played around with the OctoPrint configuration to select the correct resolution and orientation. OctoPrint uses Motion JPEG streaming for the camera. The benefit is that there is no re-encoding of the video, so the Raspberry Pi doesn’t have to do much. The downside is that this results in a lot of network traffic and the quality of the video is poor. However, for the initial purpose of keeping an eye on the printer, this is good enough.
Adding a second camera
I then added a second camera to the Raspberry Pi and was surprised by the lack of information to get another camera configured. It took me quite some time, but eventually found the bits and pieces. This is how I got it to work:
I created a new file named /home/pi/scripts/webcam2 with the following contents:
#!/bin/bash
# Start / stop streamer daemon 2

case "$1" in
    start)
        /home/pi/scripts/webcamDaemon2 >/dev/null 2>&1 &
        echo "$0: started"
        ;;
    stop)
        pkill -x webcamDaemon2
        pkill -x mjpg_streamer
        echo "$0: stopped"
        ;;
    *)
        echo "Usage: $0 {start|stop}" >&2
        ;;
esac
Then I created another one named /home/pi/scripts/webcamDaemon2 with this content:
#!/bin/bash

MJPGSTREAMER_HOME=/home/pi/mjpg-streamer
MJPGSTREAMER_INPUT_USB="input_uvc.so"
MJPGSTREAMER_INPUT_RASPICAM="input_raspicam.so"

# init configuration
camera="usb"
camera_usb_options="-r 1280x960 -f 30 -d /dev/video2"
camera_raspi_options="-fps 10"

# runs MJPG Streamer, using the provided input plugin + configuration
function runMjpgStreamer {
    input=$1
    pushd $MJPGSTREAMER_HOME
    echo Running ./mjpg_streamer -o "output_http.so -p 8081 -w ./www" -i "$input"
    LD_LIBRARY_PATH=. ./mjpg_streamer -o "output_http.so -p 8081 -w ./www" -i "$input"
    popd
}

# starts up the RasPiCam
function startRaspi {
    logger "Starting Raspberry Pi camera"
    runMjpgStreamer "$MJPGSTREAMER_INPUT_RASPICAM $camera_raspi_options"
}

# starts up the USB webcam
function startUsb {
    logger "Starting USB webcam"
    runMjpgStreamer "$MJPGSTREAMER_INPUT_USB $camera_usb_options"
}

# we need this to prevent the later calls to vcgencmd from blocking
# I have no idea why, but that's how it is...
vcgencmd version

# echo configuration
echo camera: $camera
echo usb options: $camera_usb_options
echo raspi options: $camera_raspi_options

# keep mjpg streamer running if some camera is attached
while true; do
    if [ -e "/dev/video0" ] && { [ "$camera" = "auto" ] || [ "$camera" = "usb" ] ; }; then
        startUsb
    elif [ "`vcgencmd get_camera`" = "supported=1 detected=1" ] && { [ "$camera" = "auto" ] || [ "$camera" = "raspi" ] ; }; then
        startRaspi
    fi

    sleep 120
done
Once the 2 files were in place, I made sure that they were executable and then I updated /etc/rc.local to start the second camera on boot of the Pi.
I added the following line just before the exit 0 line in that file:
/home/pi/scripts/webcam2 start
Once this was in place, I rebooted the Pi and the camera responded as planned on port 8081. Now I had to make sure that I could switch between the 2 cameras in OctoPrint. There’s a plugin for that: MultiCam. Job done. Now I can switch between the 2 cameras.
Hold on…. I noticed that interesting statement on the MultiCam page:
You may also have to invest in a USB hub to power your webcams as RPi’s tend to have low voltage issues when they are plugged in directly to the Rpi.
And that was exactly what I had to do: add a USB hub. The Raspberry Pi complained when the 2 cameras were attached to it and I had a hub laying around: easy fix.
Mounting the cameras
As you may have seen in the previous post, I mounted one camera directly to the X-axis of the printer and one is attached to the enclosure.
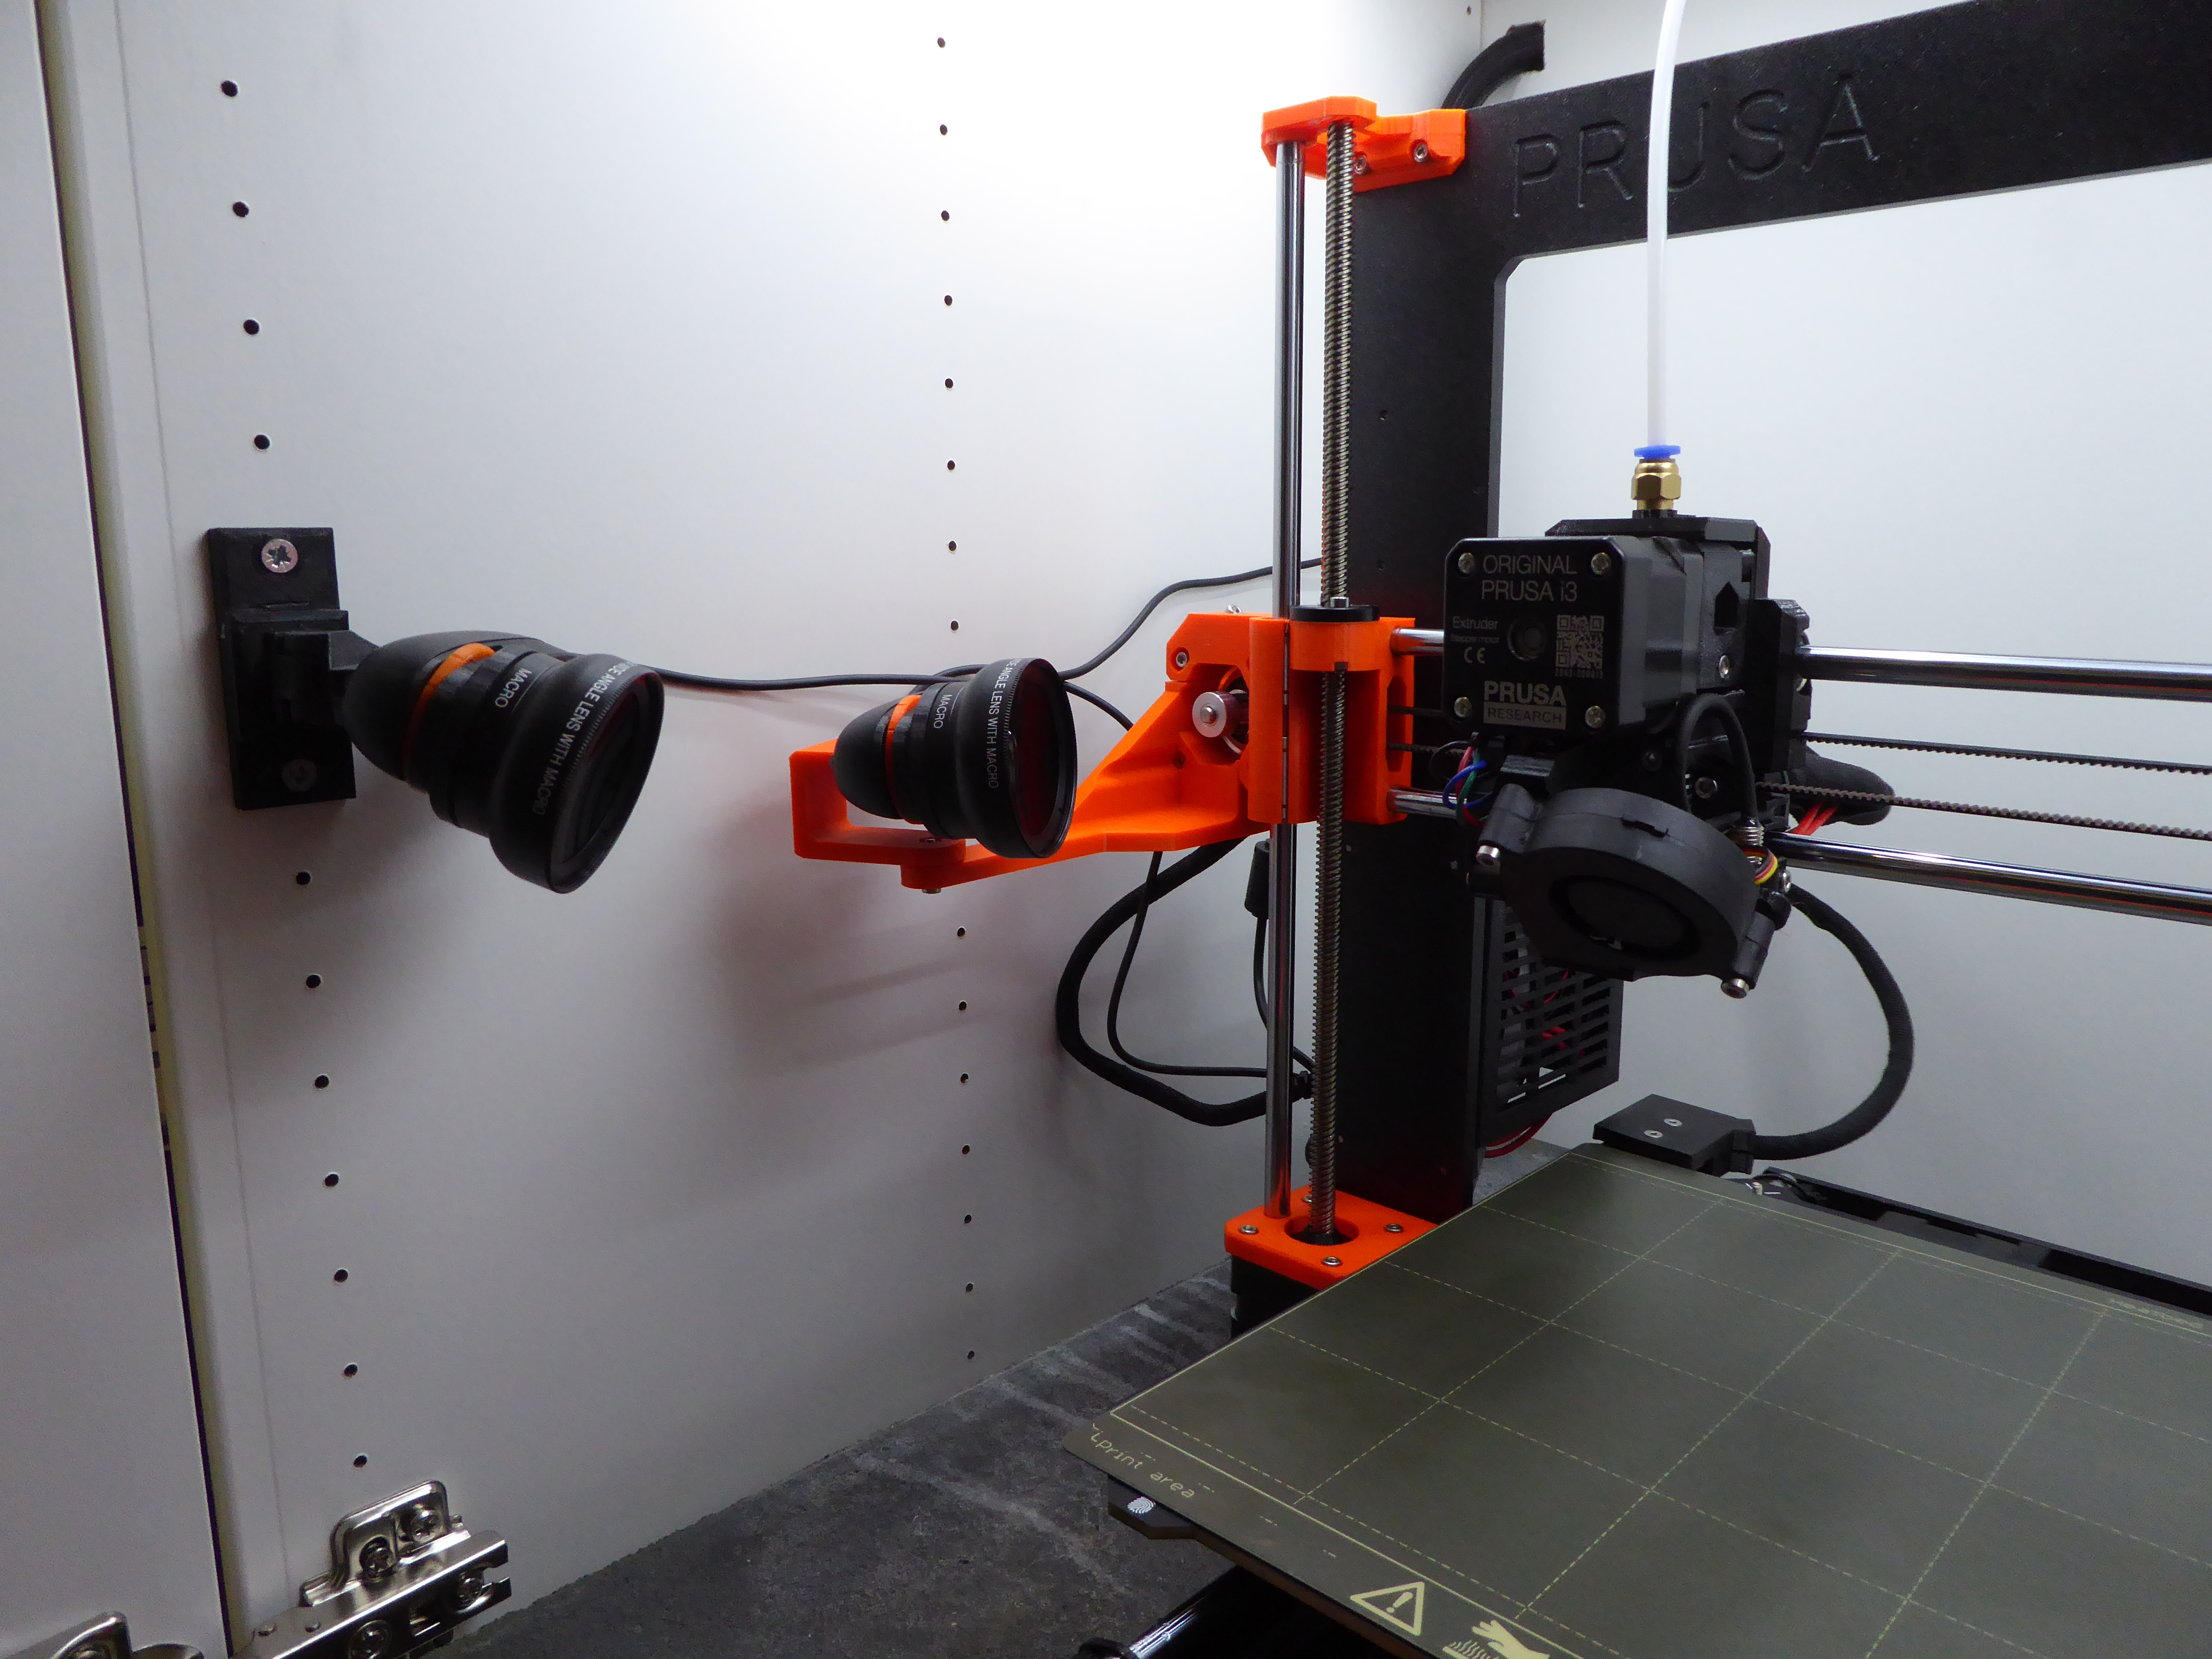
To mount a camera to the X-axis of my printer, I downloaded 2 designs from Thingiverse. This one was used to print the mount for the camera and this one was used to print the mount for my printer.
To mount a camera to the enclosure, I used this design.
Once the cameras were in place, I noticed that due to the distance between the camera and the build plate, the image was out of focus. I knew that I would run into this problem and of course somebody already found a solution. One of the reasons why this camera is used a lot is because you can focus the image by turning the lens. However, you will need to open the camera to do so… And to prevent that you will need to do so every time when you want to change focus, people have designed a solution for that.
But then I ran into another problem. Since these cameras are so close to the build plate/object that I want to look at, I can’t fit the whole build plate in the picture. Well, I was not the first one. Someone found a cheap wide-angle lens on Amazon and mounted it to a C270. Voila, problem solved. To get this going, I used this design. It includes the lens focus ring and the design includes an adaptor for the wide-angle lens. I then bought 2 wide-angle lenses from Amazon.
The final result
And here is one of the first time-lapse videos I recorded:
Did you notice the little indicator on the extruder?
I can now control my printer while I am away from it and it allows me to keep an eye on what is going on. The ability to switch between the two cameras is nice. One is showing the print nozzle, so I can see if there are issues with the filament. The other one is providing a nice overview of the object that is being printed. Next to that, I can create time-lapse videos. The camera mounted on the X-axis is in the line of sight of the camera attached to the enclosure. There’s an easy fix for that: extend the mount of the camera attached to the enclosure. I will probably replace that mount soon to fix this.
It’s not perfect yet, but I am happy with the setup for now.
Want to respond to this post?
Look me up on GitHub,
 Facebook or
 LinkedIn.
Tags
- 3D 9
- Air Safari 19
- Australia 67
- BlackBerry 1
- Blue Sky Flying Adventures 33
- By Boat 4
- By Bus 2
- Dev Containers 3
- Domoticz 2
- Driving 31
- Facebook 1
- Flying 44
- Gallery 2 7
- Google Maps 4
- Hugo 1
- Jekyll 4
- Linux 3
- NextGEN Gallery 5
- Owning a plane 8
- Podman 3
- Red Centre Tour 19
- Singapore 3
- Tasmania 10
- USA 33
- WSL 2 4
- Walking 42
- WordPress 17